 Multiplayer Level Pitch Document
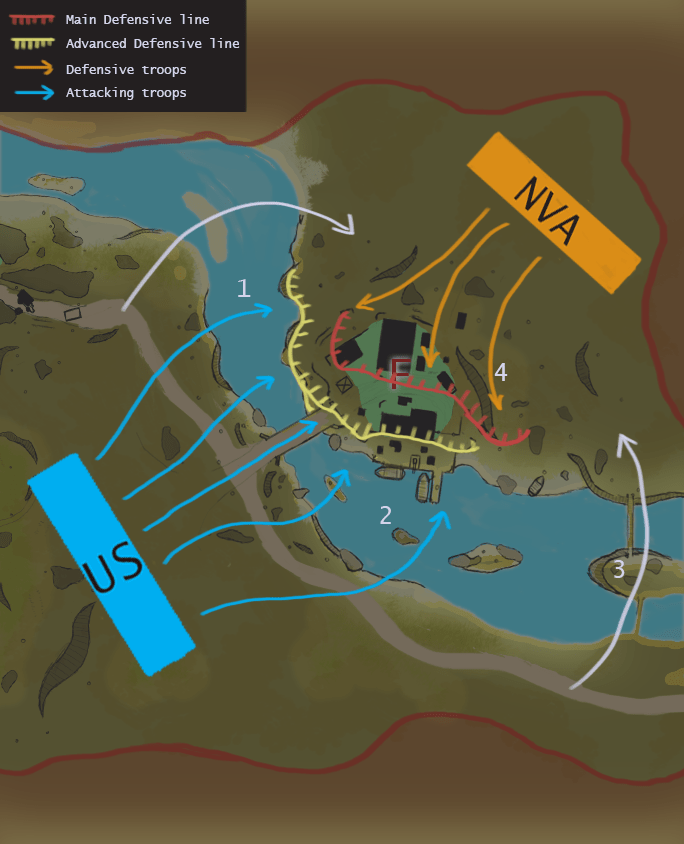
Rising Storm 2: Vietnam
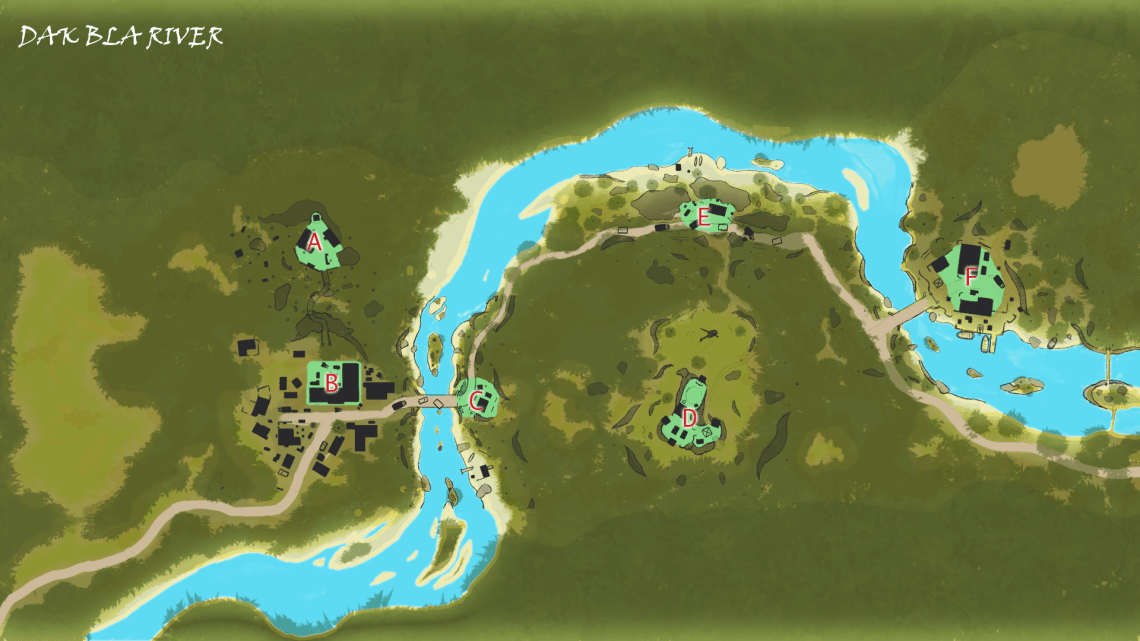
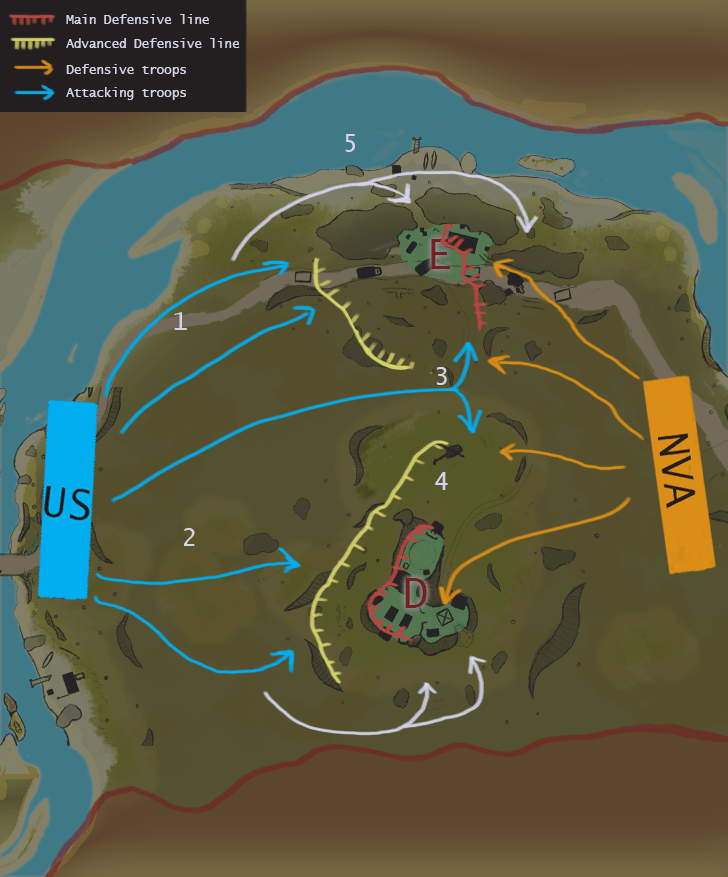
Map type: Territories
Number of Capture Points: Six capture points in four phases
Terrain: Mountainous Rainforest River
Unique features: Two shallow river crossings with a fortified hill to capture in-between. Focus on fighting through naturally occurring terrain and rocky forests to get to man-made objectives.
Introduction
This map is set on the Dak Bla River located in the central highlands of Vietnam. The scenario laid out in this map is the later elements of the Battle of Kontum, where US forces recaptured the City of Kontum and pushed the NVA back into the countryside. Just like in the follow up to the battle of Kontum, US forces will be attempting to push back NVA forces to recapture a hilltop position lost in the 1972 Easter offensive. The attacking US team will fight to capture a small market town, an abandoned forward operating base and a Vietnamese timber yard, as well as associated local objectives. The gameplay in the map focuses on two river crossings and the capture of a fortified hill position between those points. Attackers will have to take advantage of accessible flanking routes to try and get the upper hand. Defenders will have to utilise the natural terrain, various kill zones, high ground, and choke points to come out victorious.

Overall Map Phases

Phase 1
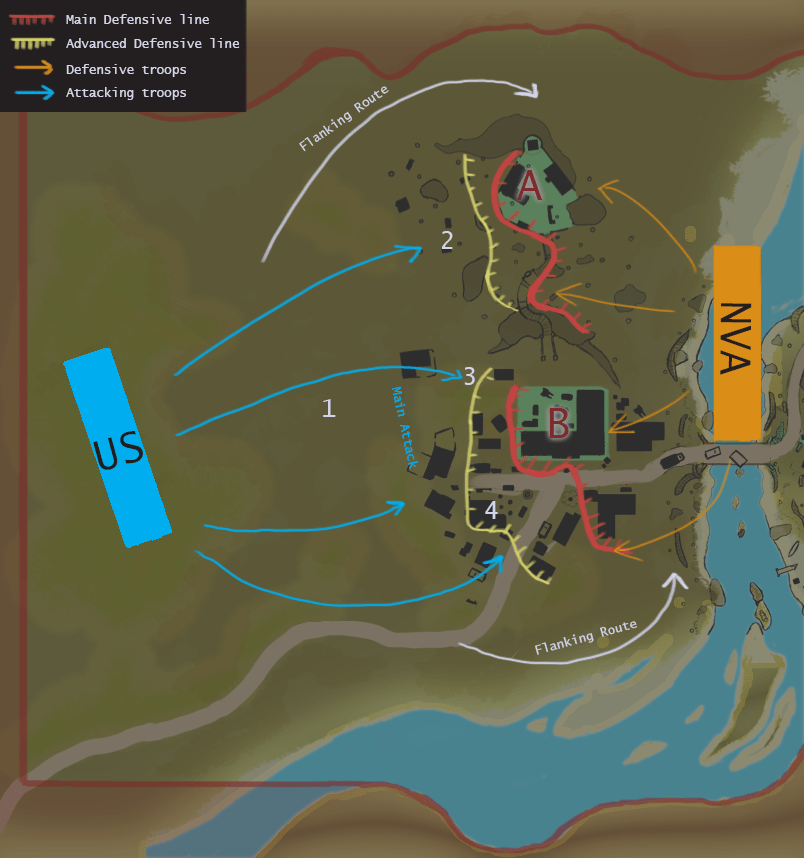
US forces spawn in a clearing to the West side of the map and must head east towards objectives A and B. Vietnamese forces spawn in the river bed and have to get into good cover positions in the town or at the temple to repel the US troops. Fighting will be in closer quarters with more cover and obscuring elements, as well as plenty of opportunities to flank defenders and attackers.
Key Points:
- Wooded Area: American forces must push through to get towards the objectives. Tree lines and cover should give them a clear route to the outskirts of the town and northern hill base.
- Hill advance towards the temple grounds: The route is rocky and also has graves that can provide point to point cover while pushing up the hill. Once at the top, the combat is in much closer quarters and will favour troops with close quarter weapons such as flamethrowers.
- If captured, the house on the forest edge gives US forces a solid piece of cover to advance, either into the north of the town towards the market building capture point, or as an opportunity to widen the attack on A.
- The café, and other buildings within the town, give attacking and defending forces plenty of low cover and opportunities to clear buildings. Both of the major streets have relatively sparse cover, so pushing down them will leave teams exposed. The more open layout of the town should open plenty of flanking opportunities to cut around enemy lines.
Objective A: The Temple

The Buddhist temple, situated on the top of a forested cliff, has exterior walls and three buildings around the summit point. Due to being positioned on a cliff, there are only a few access points either side of the capture zone, and only one central main entrance. Both NVA and US forces have to advance up the hill to get to the point. There is an opportunity for teams to clash along the stairs as a central battle ground, or defend from the high ground. There is a clear flanking path to the north of the temple that would allow forces to come around and hamper defending or attacking reinforcements. Entrances to the temple grounds act as choke points, and the high ground advantage is something the defending force must utilise. Capturing A gives attackers the opportunity to flank objective B from the north and gives them a high ground advantage. Defending forces at A can spread down the hill to overlook objective B and give fire support.
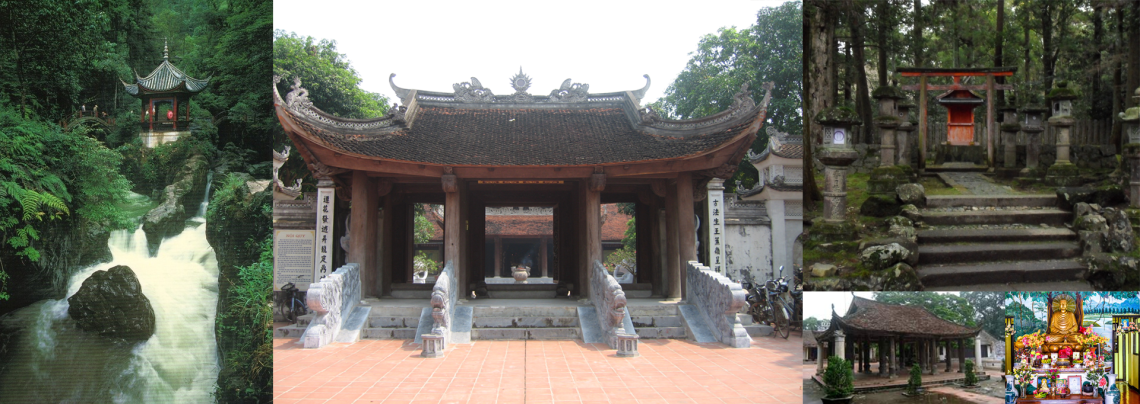
Thematically this area will be quite tranquil and peaceful. All fighting in this area juxtaposes the temple, which will have minimal aesthetic damage from the war itself. Most of the damage to the outer walls comes from old age and plant growth.
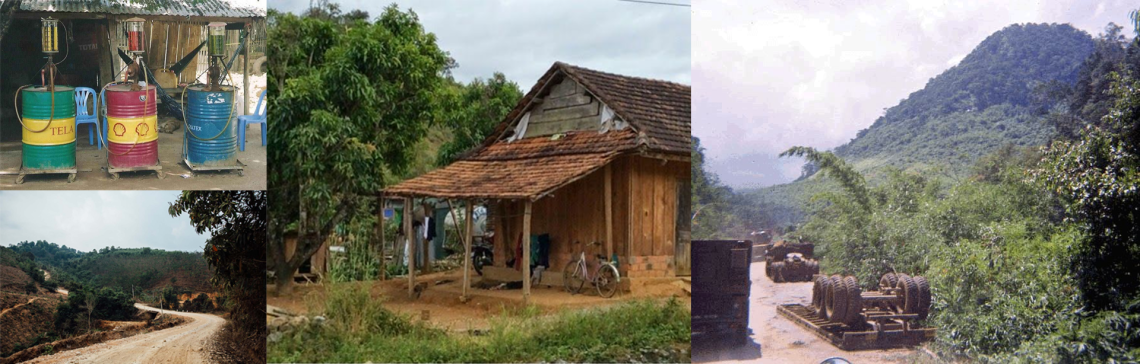
Objective B: The Market
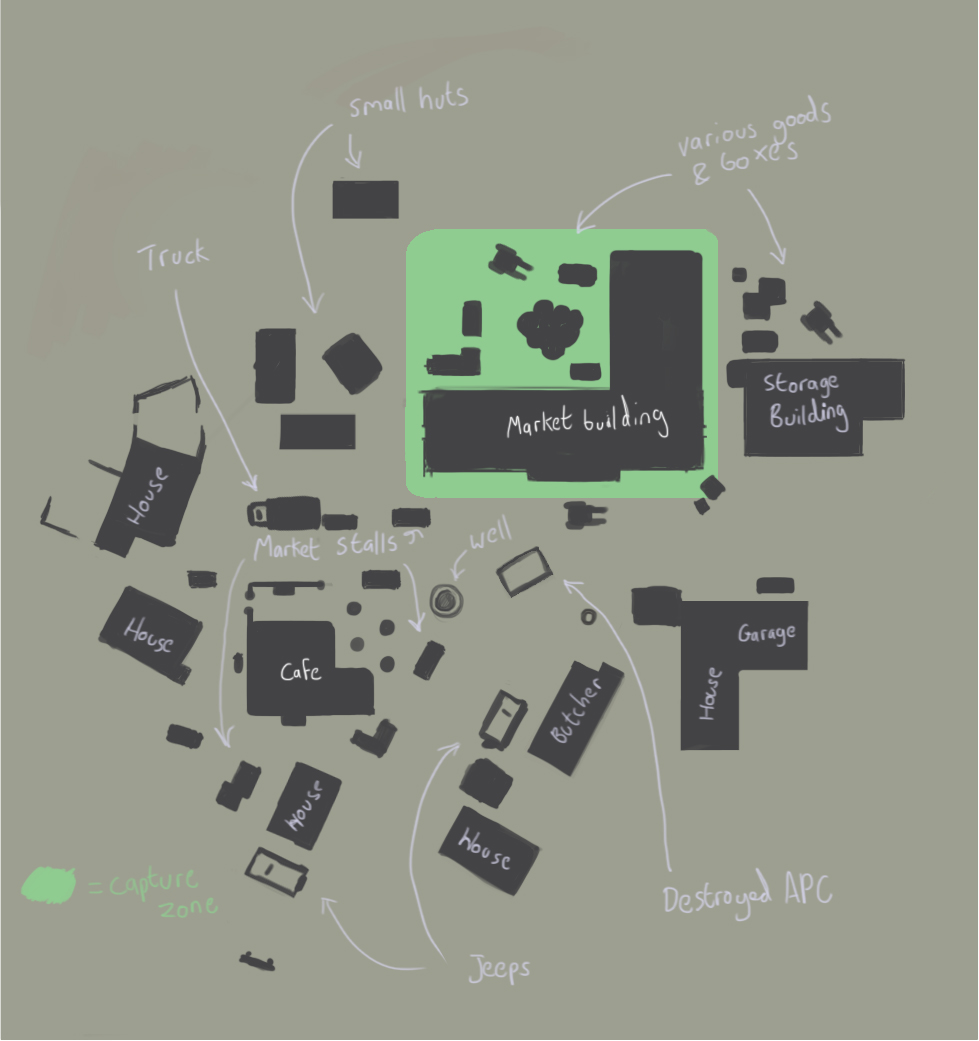
The Main Market building is situated in the centre of the small market town. It is full of small stalls and goods such as rice and timber. Those little cover elements and vision obscurers should introduce some interesting close quarters scenarios when capturing the point. The town itself is quite exposed with the streets mostly clear to offer effective kill zones. This will force attackers to pursue flanking around the open edges of the town to get around the point, or push through the close quarters offered by the buildings. Capturing point B first, allows attackers to better surround the Temple hill, therefore opening more attack options, and starts hampering defenders trying to reinforce objective A.
The Town is a mixture of concrete and more rural shacks. The primary focus is the market itself with plenty of stalls and goods boxes etc. The market is usually busy and bustling but is now silent and evacuated.
Phase 2

In Phase 2 US forces move through the captured town towards the first river crossing. This is where the natural terrain starts to contribute to the action around the point a lot more. The most direct route across the bridge is the most obvious choke point with attackers being very vulnerable to fire as they cross. The River itself should create a no man’s land between the two opposing teams, with the river banks being the primary firing positions. Suppressing defensive positions and moving forward will be the best way to ford the river, failing that there are wide flanking routes to the North and South of the point allowing attackers to sweep around defenders. Defenders will need to take advantage of the river kill zones, high ground on the cliffs, and natural choke points in the terrain on the east river bank.
Key Points:
- The exposed river will offer little cover and will have to be crossed as quickly as possible by attackers. Once across they will find cover on the opposite beaches and will have to fight up the cliff area, with squads creating mini beachheads.
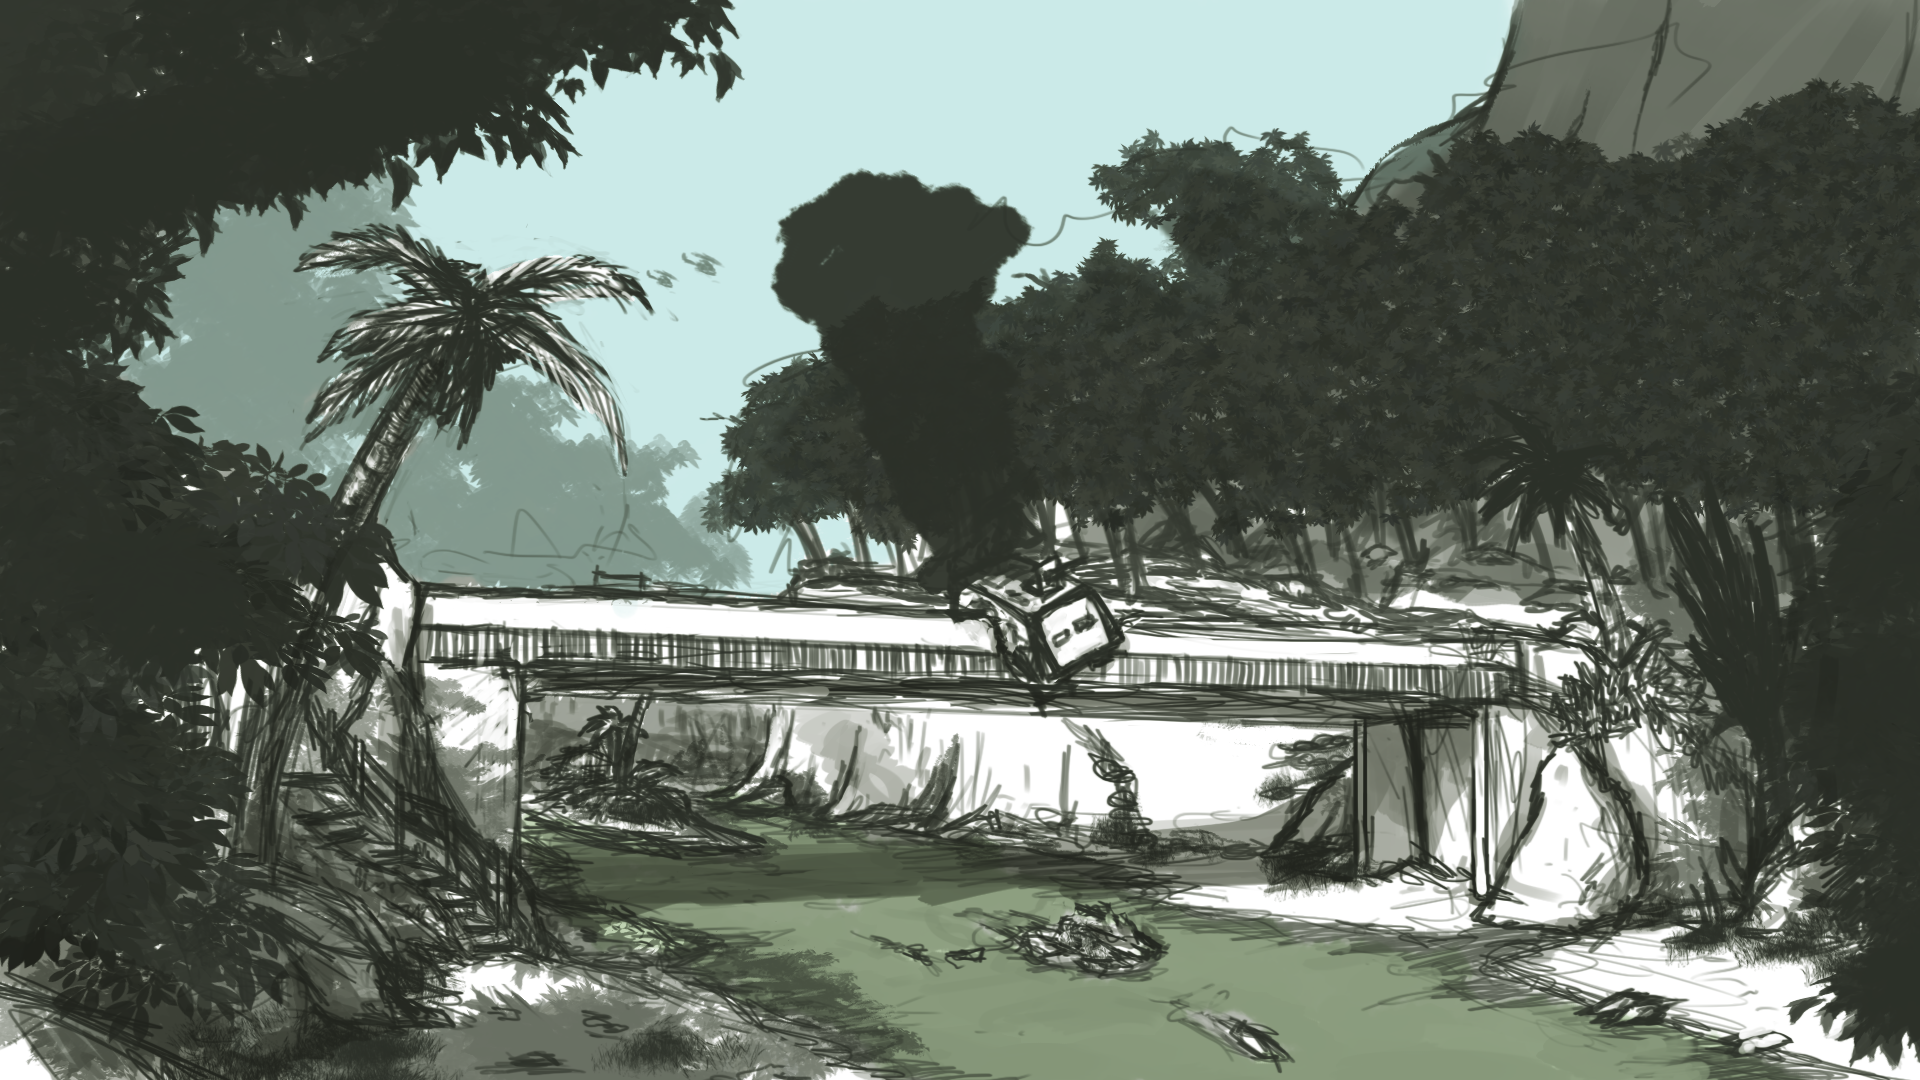
- The Bridge has some cover to the West but is exposed to the East, so without considerable cover fire or smoke grenades the crossing will be difficult. The underneath of the bridge plays into the attackers’ hands as they gain protection from direct fire from point C, but it leaves their flanks exposed.
- The small fishing hut to the South of C acts as a focus point for defenders and a target for attackers, as capturing it gives them a more solid foothold on the East river bank.
Objective C: East River Bank
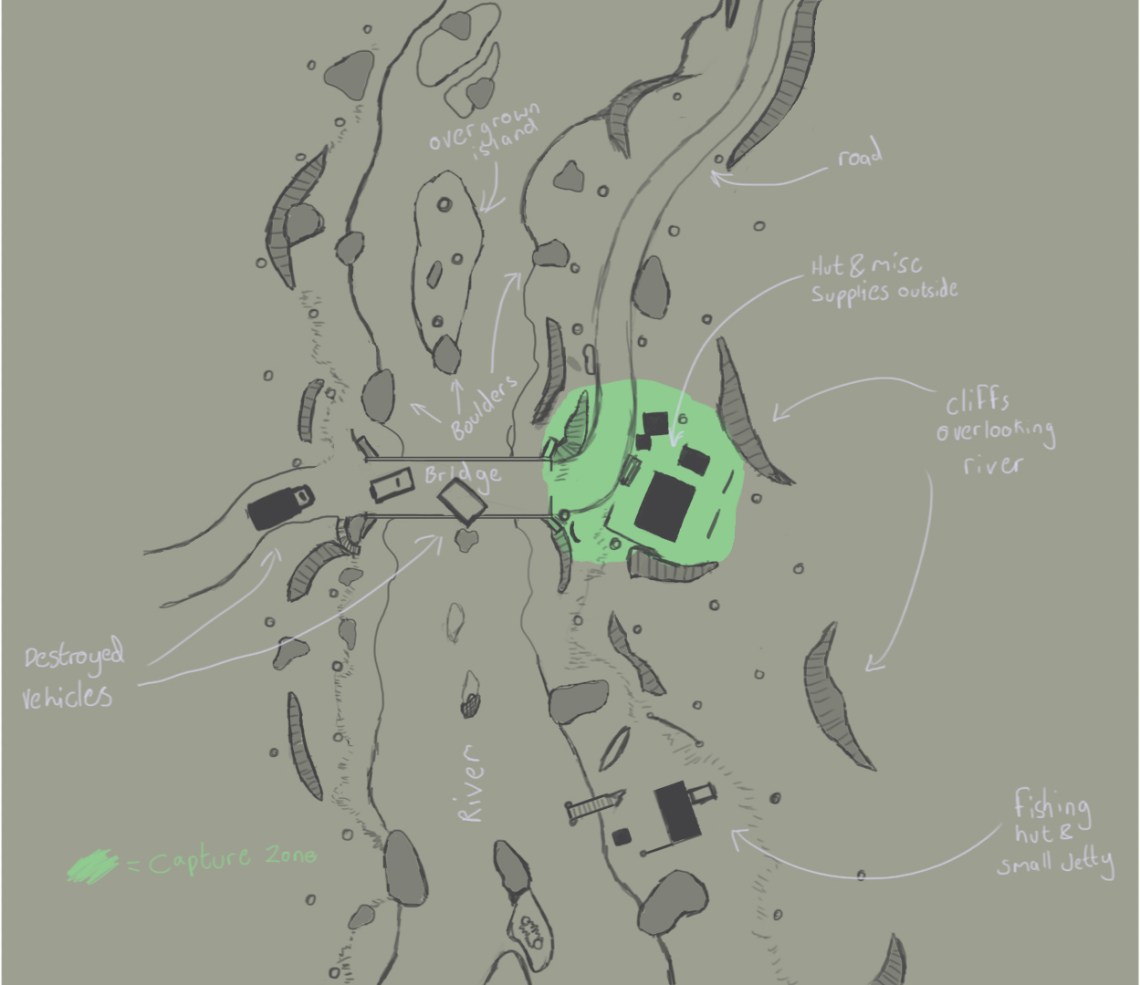
The River Bank capture point is a small bamboo house with boxes of supplies and stacked timber/bamboo. The cliffs, and forested area around the objective to the South, give defenders plenty of cover towards the fishing hut. The more open dirt road to the North is exposed allowing defenders clear sightlines and firing angles from point C. The cliffs, if cleared, by attacking forces can be used to start firing upon C from the high ground. This will incentivise advanced flanking and snipers moving into advanced positions.

The Bridge and river banks are the main focus of this section. Getting the natural environment and manmade objects to mesh together will be the key element to its visual aesthetic. The Destroyed M113 has crashed through the wall of the bridge and is potentially burning to cover sight lines on the west shore.
Phase 3
Phase 3 should be where the fighting gets a lot meatier for both teams. Short sight ranges created by foliage cover, as well as the terrain height variables, should cause a mixture of close, medium and long range combat through the forests. For attackers, objective D is an uphill attack through the woods towards the fortified forward operating base. Defenders can use the capture zone itself as a defensive hardpoint, but to be able to attack advancing US forces from a better high ground position, as they push up the hill, the NVA will have to push forward to the overlooking clifftops. Objective E is an entirely different challenge, as a narrow passage with exposed forest to the South and beaches to the North. US forces can try to push through the middle of the two objectives to allow them to split off and surround either objective.
Key Points:
- The Road is exposed but offers the most direct and unobstructed route towards Objective E. Closer towards the objective, a ditch north of the road gives US forces a more covered route to advance down.
- Uphill battle through forested area littered with boulders and other natural cover. Potentially craters from bombing runs as well.
- The slightly uphill middle section of the ridge between D and E offers attackers a route to exploit a divide between the two objectives. Defenders can however reinforce and hit these central attacks in the flanks as they proceed towards either objective.
- Open grassed area at the top of the hill at D. The crashed Huey in the middle gives a focus point in the middle of the open space, and something for both teams to push for to protect or assault D.
- The Beach to the North of this section allows attacking forces to have an open flanking opportunity on E. Defenders can try to protect this flank or fall back on the chokepoints protecting the north flank.
Objective D: Forward Operating Base
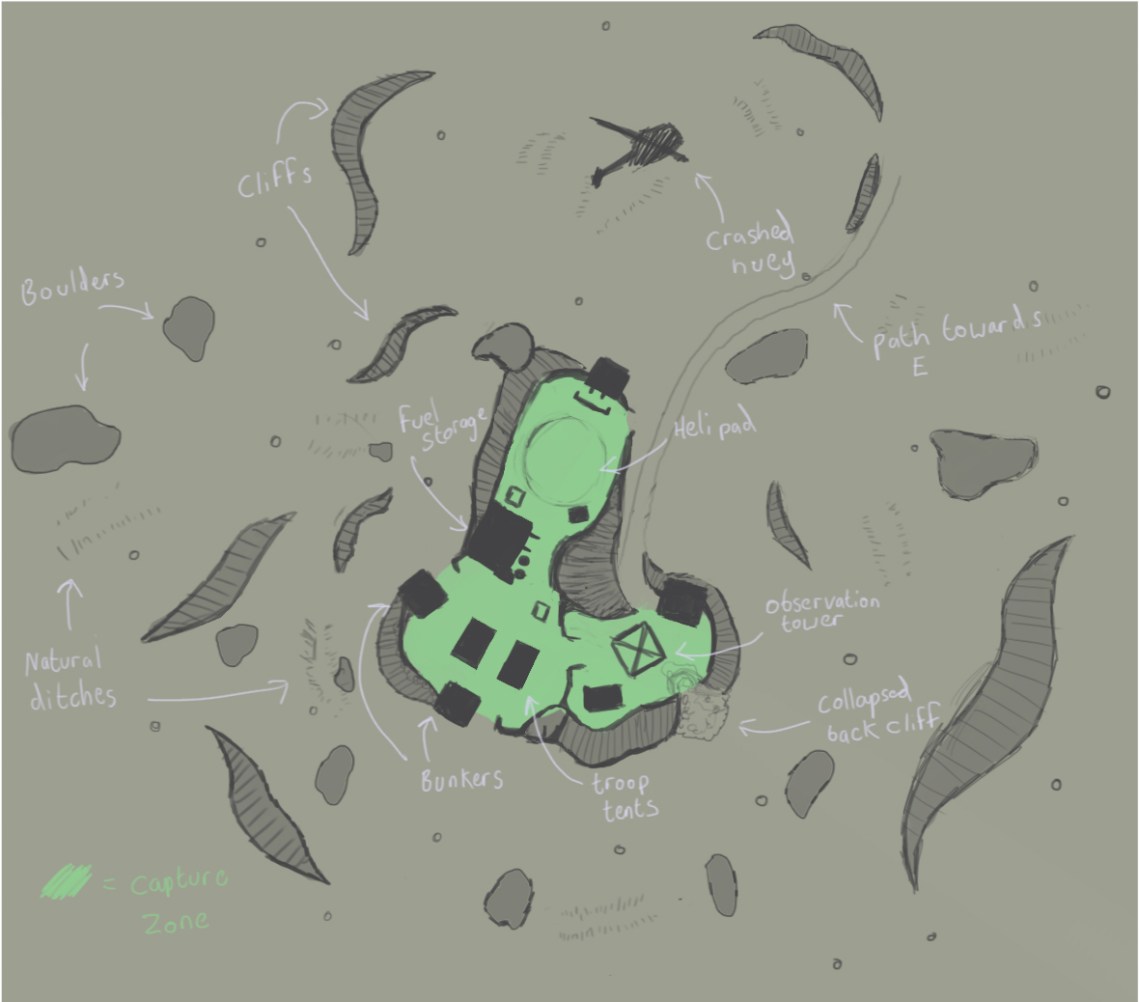
The abandoned forward operating base is one of the major points required to capture the valley. It sits as the highest point in the playable area and is strategically important because of this. Attackers must push up the hill and fight through the various natural chokepoints that funnel them towards D. Defenders have a very strong position at the top of the hill, but their reinforcement routes are vulnerable unless squads make proper use of their tunnels. Flanking to the south offers an opportunity to get on top of defensive forces by exploiting the collapsed cliffside. Capturing D gives attacking forces a strong position to push into E. However, they must make sure they defend the point from a counter attack so as not to end up losing significant progress.
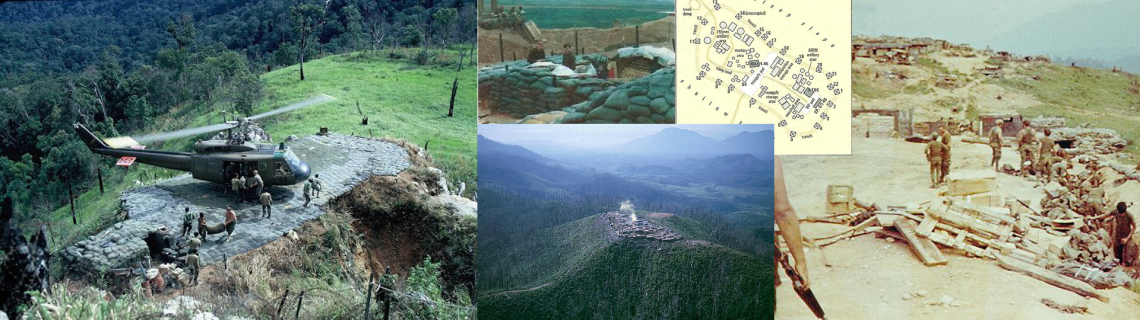
A cleared and fortified area centralised on the raised ground where the observation tower sits. The FOB includes a place for Hueys to land for resupply missions, as well as sleeping places for troops. The crashed Huey also suggests it was shot down while taking off or attempting to land.
Objective E: Waystation Pass

The Waystation pass is a tight and narrow passage between a set of large rock formations and the forested hillside that leads up to D. The rock formations cause a tight stretch of road, but also allows the beach to be relatively well covered from firing positions on the hillside. The tightness of the road, and the inclusion of a partially destroyed convoy, mean that the path is a viable route for both teams to advance to the point as it is relatively well covered. Flanking from the North of the point should offer the most tactical route to attackers working their way down the river itself. Defenders should be able to take advantage of the cover the waystation provides to defend this point from its limited entry points.
The scene is that of a successful ambush and will have seen some severe damage from the firefight between the US convoy and NVA ambushers. There will be several destroyed vehicles, and the waystation itself will have visibly been involved in the fighting.
Phase 4
The final battle for the control of the map concludes here in Phase 4. A mixture of a river crossing, and clearing of the compound on the other side, should play out in a challenging, but entertaining, encounter between attacking and defending teams. Attackers must push down the hill towards the bridge, cross the river, and clear and capture the buildings on the other side to win. Defenders need to hunker down in the many defensive positions available to them within the timber yard, utilise vantage points to the rear of the objective, and maintain control of the buildings within the yard to win. Both teams will be split by the river in between the two spawn zones and, again, will have to use the active firing positions on each river bank to successfully hold/attack the point. The attackers have two main flanking routes that will put them in advantageous positions, the defenders will have to be mindful of these and take advantage of the chokepoints and exposed sections to defend them adequately. Sniper battles here will be highly effective, as high ground with good sight lines is available to both NVA and US snipers. Attackers will also have to utilise the blind spots provided by the layout to successfully cross the river.
Key points:
- Exposed river flank will be useful for getting around defences on the riverbank, but will leave US forces vulnerable whilst advancing.
- Dock area is useful to attackers as it provides a defensive blind spot. However, the cover within the dock building will mean attackers will be challenged as soon as they make it to the other side and up the ladders.
- Rope bridged flank allows attackers to flank the east cliffs, but the bridge acts as a defendable chokepoint as well.
- East cliffs provide excellent firing positions to cover F; however, it is outside of the capture zone, so defenders will need to cover both areas.
Objective F: The Timber Yard

The timber yard offers the second river crossing in the map and also the first set of industrial style buildings. The landscape along the river front provides lots of cover, but is also quite likely to be under fire from the opposite bank. Teams along these sections will have to stay low to avoid snipers or large amounts of enemy fire. The storage, timber processing and office buildings offer hard cover points for defenders, but will also be vulnerable to flanking moves with close quarter weaponry. The point gives protection to defenders from artillery and air attacks, but only if they position themselves in the buildings – which opens up options for attacking forces.

The timber yard will be muddy, with well used rural industrial buildings. Stacks of wood will add to the décor of the yard itself as well as the larger building interiors. The storage building opens out onto the dock, with goods from the timber yard being prepared to be loaded up onto the waiting Sampa boats.
Map Overall
The winning team will be the team that can best establish stable firing positions and utilise the multiple terrain positions to their advantage. For attacking forces, trying to capture objectives C and D as quickly as possible will mean they don’t become bogged down and lose lots of tickets in the mid game, and are ready for when they attack the final objective. The defending team will have to make use of tunnels and traps available to punish US forces that try and take advantage of the main routes.
I believe that the map will present a unique and different kind of challenge that will give both teams a feeling of fighting through a beautiful, yet rugged, landscape and capture the exposed feeling advancing US forces had as they pushed into enemy territory. The cliffs and rocky elements will cause the map to open up and narrow down in natural ways whilst the teams fight through the wooded areas, creating natural chokepoints that defenders can exploit and attackers have to consider.
Balancing Issues
These are a couple of suggestions for both teams in case the map does not balance out well in its initial testing.
Attacking
If US forces manage to quickly take advantage of the exposed nature of the objectives, blockers could be easily added to certain pathways and routes to give defenders a better chance of holding points. We could also push the US spawn points further back to give defenders extra time to get into position.
Defending
If NVA forces manage to hold the points with ease, adding an attack helicopter could interrupt certain defensive points. This could be balanced with a couple of emplaced machine guns on the NVA side or extra RPG troops to take advantage of the helicopter having to fly low to get effective shots in.
Technical
The varied topography, as well as the tree cover, should allow for LODing to be relatively unobtrusive to the player; however, it may be noticeable over the longer distances like over the river crossings. There is a slight concern over the frame rate with fighting taking place over a shallow translucent river with a large amount of foliage and lots of players.
